Showing posts with label scrap quilts. Show all posts

Sunday, October 18, 2020

FH Quilt - reimagined! #uanduqal

Quilt inspiration from Unconventional and Unexpected, by Rod Kiracofe.  Early last year, Sujata Shah put out a challenge to quilters, to make a quilt inspired by a quilt from the book. Mine is finally done!


I started with a vintage string quilt made by my grandma, Frances Heggestad.  Grandma signed her letters "love, Gramps and FH", so I call this FH Quilt.  I took the blocks apart - which were about 12-1/2" square - and recut the blocks into (4) 6" square blocks.  Many of these 6" blocks were  not used, due to damage.  Her quilt was well-loved!  You can see my first post about this here.


Auditioning fabrics for sashing and cornerstones.  After trying muslin, and gray, I ended up with various blues and reds for sashing, and several different prints for the cornerstones. 


Progress on the design wall.  As usual, I had not purchased enough of the reds and blues, so I ended up supplementing with some in my stash.  I love scrappy quilts, so this was a happy accident. Grandma never purchased fabrics for her many quilts.  She used old clothes, and scraps, given to her by friends and family.  Grandma made some quilts which she kept, or gave to family members, but she gave many more to charity.  


I love this old photo of my grandma, c. 1940.  That's my dad, a new sailor with the Navy (he enlisted), and his brothers Orville and Gordon.  

Here is the original quilt top, before I ripped apart the blocks.  

Ta da!  The completed project - FH Quilt Reimagined.  I used my favorite poly cotton blend batting, and soft muslin on the back.  

Photo shoot.  I love how it turned out! I think Grandma would have liked it. 

Close up, showing the ties and binding.  


Monday, November 7, 2016

Butterfly Galaxy!


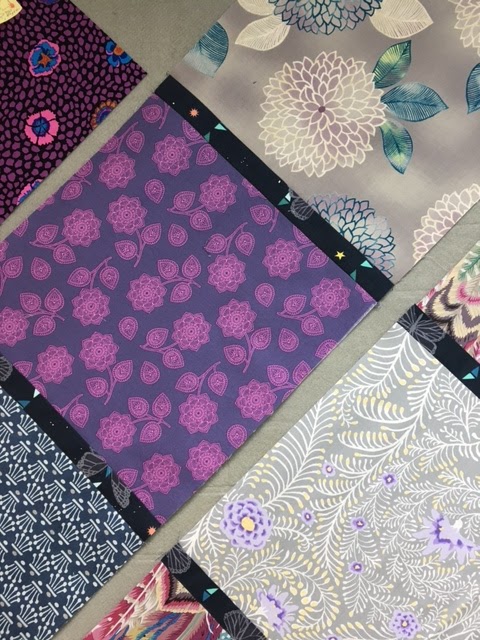
Butterfly Galaxy belongs to my daughter, Genevieve - here she is, showing it off over the railing at her cute apartment.  Gen requested blue, purple and gray as a color scheme, so I started collecting fabrics.  I had seen a similar quilt on pinterest (see below, sorry I know little about its maker or origin):
Inspiration! Nice large pieces of gorgeous Kaffe Fassett fabrics, with narrow sashing and tiny cornerstones.  I bought various types of fabrics, and in different cities, also used some from my stash.  Gen helped with the block arrangement, which she thoroughly enjoyed.
I arranged the blocks on my design wall, auditioning my feature fabric as a possible sashing, and hoping to use the blue cotton lawn bird print as the edge/setting triangles.


Feature fabric (Gen named the quilt Butterfly Galaxy after seeing this fabric).  Initially, I planned to used the aqua flying geese "stripes" as the piping (fussy cut) but it was too intense.  I cross-cut strips instead, and the appearance was more fun and random.

Blocks with sashing inserted.

Blocks sewn into diagonal strips, marked and ready for assembly.

After the stunning machine quilting by Sue Pawlowski, I like to add a piping before the binding.  You can see the gorgeous feather quilting by Sue on that pretty cotton lawn.

Finished join seam of the binding.  I leave long pieces at the beginning and end of the binding application, so I can sew them together rather than overlap them. 

Close-up of the quilting, and the binding and piping.

Quilt at home in Gen's apartment.

I think that Buddy approves!

The best part? Genevieve loves it! 

Thursday, August 4, 2016

"Fun" Pillow!

We took a car trip to Minnesota over Memorial Day weekend, and I wanted a hand-sewing project to work on in the car.  What to do? While I enjoy hand work, I just don't do it that often - so I had to dream up a "fun" (you'll get the meaning later) project.
I ended up with this charming pillow, inspired by two wonderful bloggers.  

This fabulous quilt, Spring Shoots, is by the creative and talented quilter, Lou Ann at Nifty Quilts.  If you have never visited her blog, you really should!  Her quilts boost scrap quilts to an art form.  And this quilt has been up on my inspiration board for a while!

Then this lovely bounty of scraps landed in my lap from another quiltland blogger, Barb of Fun with Barb (hence the "fun" reference).  Hers is another great blog, not to be missed! Barb has excellent workmanship as well as design, creating some knockout handcrafted beauties. 

I won the fabrics from a feature on her blog, and after spreading them out to admire them, I started wondering what I would use them for...until I got the idea to make a pillow, inspired by Lee Ann's quilt!

I brought along a picture of the quilt to inspire me, plus some hand drawn leaf patterns to use for patterns, and went to town creating leaf after lovely leaf.  I cut out the leaf patterns from paper, and then wrapped the fabric over the edges and hand sewed to secure. 

This was a perfect passenger seat, or hotel room at night, project.  I even had the idea I would continue the hand work and actually hand-applique the leaves onto the background after we got back home.

Then the reality of my busy life, and other quilting projects in the queue, suggested that I use machine applique.  And voila! I guess I should call it a fun & nifty pillow! 

Sunday, January 18, 2015

Exuberant Wanda - in person!

Last weekend, it was my pleasure to reconnect with a dear friend, Wanda Hanson of Exuberant Color.  Wanda and I were in a bee together years ago, and while we "see" each other in blogland, this was our first meeting in over 20 years! Where does the time go???

Wanda and I holding her beautiful zigzag quilt - done in Wanda's favorite scrap style, and with a touch of zebra - she loves everything zebra!  This zigzag pattern is by Sujata over at Root Connection.  

I think this pattern is called Soul Searching by Kathy Doughty (at Material Obsession).  I like how Wanda put the "color jars" closer to each other than in Kathy's desigh.

This photo - as with all the others, actually - does NOT do this quilt justice!  It is a stunning  collection of Kaffe and other fabrics - those yellow and pink prints are so sunny and happy, like the most gorgeous garden.

This quilt is called pluses, I think.  Another great scrap quilt! And check out another Kathy Doughty design in the background with the wedge shapes. 

I call this one Wonky Trip - great in the reds with grays.  Wanda truly understands color - how you need to balance values, and warm and cool colors.  

Another wonky trip - Wanda has an AMAZING stash, and  it really shows in her quilts.  

Another view of Wanda's zigzag - the end to a perfect visit!  Make sure to visit Wanda's blog to see what she's up to!


Wednesday, February 20, 2013

February Quilt Along

Once again, Melody over at fibermania is hosting a February quilt along - called Quilt Along With Melody, or QUAM.  She picks a new project for us to do each February, and since it's just for one month, it's kind of nice - the project has an end date! Of course you don't have to complete an entire quilt, you can just try out a new technique or patter with a block or small quilt top.  

I credit Melody with helping me to get my quilting mojo back during QAWM in February, 2010.  Thanks, Mel!
This year's project is one of the current fave's of blogland, Scrappy Trip Around the World blocks.  I thought this was a perfect project to use my my many plaid scraps (from my previous project), and also incorporating other print scraps, old and new.

After cutting a bunch of strips, I went searching for something to arrange them on - I thought that Emily had a laundry rack in the attic - couldn't find it, but I did find an unused quilt rack! Perfect! 
I've finished three blocks so far - they go together easily, and are fun to do when I get a few spare minutes.  Wonder how many I will complete in the next week or so?


Tuesday, August 16, 2011

T-Shirt Quilt Tutorial Part 1

Hannah and I have been working on a super fun project. Her roommate, Katie, asked Hannah to create a t-shirt quilt for her out of her old, favorite t-shirts. Hannah graciously said "yes", and then said, "Mom, can you help?"


I have never made a t-shirt quilt before, but I have helped a friend make one, and have read lots about it. Add that to my years of quilting and sewing experience, and off we went to the fabric store!


Step 1: Hannah selected a very cute limey green with multicolor dots for the borders (you will see this in a later post), and some iron-on Easy Knit to back/stabilize the shirts. Hannah decided that, after stabilizing, we would then cut out the cute parts of the shirts, not trying to make them all the same size at all, but rather all different sizes.


I figured we would use the green dots for the in-between fabric, to make it all fit, but Hannah had her own idea - and it was an excellent idea!


Step 2: First, we rough cut (with scissors) sections out of each shirt, bigger than the final block sizes. We used the front and back of some shirts, as per Katie's request. Then, we ironed stabilizer onto the back of the cut sections, and finally used rotary cutter and rulers to cut the final blocks out of the shirt pieces.


Step 3: Then, to get a pleasing arrangement, we laid all of our cut shapes on Hannah's bed, which helped in two ways. We could play around with colors and shapes until we liked it, and it would fit, and also we could see if the overall size was right. We originally thought we would be making a two-sided quilt, as Katie gave us lots of shirts! But we ended up with a full/queen size with only the top pieced from shirts. Hannah photographed the finished* arrangement with her phone. We needed fabric to sew between some of the blocks, to make it all fit. Hannah wanted to use all different fabrics from my scraps and stash. We never repeated a fabric, and just sort of designed as we went along.


Step 4: My design wall was so helpful!!! After putting all of the blocks up on the wall, using our photograph as a guide, we started at the center, and built a vertical strip up and down from the penguin (not pictured, sorry you'll see him below). As we worked, section by section, we would pin up hunks of scrap fabric to audition for the sashing pieces. We thought we had a final arrangment (see * above!), but we ended up moving blocks around on the design wall as needed. We would sew blocks and strips together until we liked it, pressing as we went along.


TIP: Use a press cloth! Even with a press cloth, my iron still got pretty gunked up. But that's what iron cleaner is for, right? Also, we did sort of ruin one of Katie's home-made iron-on shirts...but she was ok with that (thankfully!).

Above shows the lower left section, after most of its scrappy fabric had been added.


Step 5: After sewing the center strip together, we started joining the other parts together in sections, thinking through the math and the sewing as we went along. There were only a few times when we both had to stop and say, wait a minute, how is this going to go together?

I LOVE Hannah's design, using odd shaped-cutouts from the shirts. It gives each piece its own identity much better than cutting out squares, all the same size. And I also love the use of scraps, but that's no surprise - scrap quilts are my favorite!

Stay tuned for the next part of our tutorial!


Happy New Year!

Happy new year!  Here's hoping for peace in our world!  A quote that I carry around with me is from my hometown pastor, from years ago -...